By default, the interpreter draws all the windows and controls for the game's GUI. However, with some creative coding, they can be easily customized. This tutorial will teach you how to create custom buttons with views.
First you need to open your game in SCI Studio, loading the Resource Explorer.
First the buttons will need a view so there's something to draw. I've set up the view so that cels 0-3 are for the button's edges, and 4-7 are for the left, top, right and bottom borders. It can be easily customized to create your own custom button.
The cels are 8x8 pixels. Though they really would only need to be 4x4, they should be no less than 8x8. If they are too small, it will take too long to draw the buttons.
To save time, click here and download it.
Add the view to the game. I chose to number it view.900, but it can be numbered anything you like.
In the resource explorer, select Script from the left resource tree. This will bring up the list of scripts in your game on the right. Double click on the "Controls.sc" script. It will load it up in the script editor.
Though customizing a button is generally simple, there are many extra steps which must be taken to give it optimum performance and prevent interference.
|
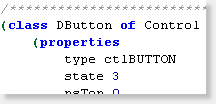
First, scroll down controls.sc to the DButton class. |
|
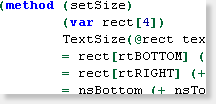
Next, scroll down to the setSize() method. |
Change:Code:= nsBottom (+ nsTop rect[rtBOTTOM])
To:Code:= nsBottom (+ nsTop(| (& rect[rtBOTTOM] $FFFC) 7))and
Change:Code:= nsRight (+ rect[rtRIGHT] nsLeft)
To:Code:= nsRight (+ (| (& rect[rtRIGHT] $FFFC) 7) nsLeft)This makes the control always in dimensions divisible by eight (i.e. 8,16,24,32,etc.). This is needed because we are using 8x8 cels.
Next, we'll need to add a draw method to the DButton class to override the default one.
Add the following code to the DButton class.Code:(method (draw)
(var x, y, x2, y2, w, h, rect[4])
// Calculate the areas
= x2 (- nsRight 8)
= y2 (- nsBottom 8)
= w (- nsRight nsLeft)
= h (- nsBottom nsTop)
TextSize(@rect text font)
// Draw the side borders
(for(= y(+ nsTop 8)) (< y y2) (= y + y 8)
DrawCel(900 0 4 nsLeft y -1)
DrawCel(900 0 6 x2 y -1)
)
// Draw the top and bottom borders
(for(= x(+ nsLeft 8)) (< x x2) (= x + x 8)
DrawCel(900 0 5 x nsTop -1)
DrawCel(900 0 7 x y2 -1)
)
// Draw the corners
DrawCel(900 0 0 nsLeft nsTop -1)
DrawCel(900 0 1 x2 nsTop -1)
DrawCel(900 0 2 nsLeft y2 -1)
DrawCel(900 0 3 x2 y2 -1)
// Draw the text
Display(text
dsCOORD
+ nsLeft (>> (- w rect[rtRIGHT]) 1)
+ (+ nsTop (>> (- h rect[rtBOTTOM]) 1) 1)
dsCOLOR
gWndColor
dsBACKGROUND
clTRANSPARENT
dsFONT
font
dsWIDTH
rect[rtRIGHT]
)
)Needless to say, that code draws the button. It draws the border and edges, then centers and draws the text. It doesn't bother drawing the inside of the button and just leaves it transparent for speed. It would be a lot slower if it filled in the button with cels.
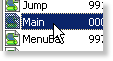 |
Chances are, you'll want to customize the window colors to go with the button, right? If that's the case, open up the "Main.sc" script. |
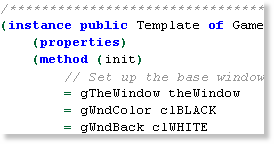 |
Next, scroll down main.sc to the Game instance. At the very top of the init() method, you will see the window color initialization. |
To go with the default custom button, we'll make the window silver. Change:Code:= gWndBack clWHITE
To:Code:= gWndBack clSILVER
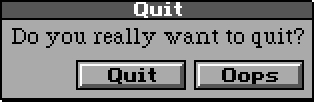
Run the game all you'll see your brand new custom buttons!
That sums it up! Be sure to check out how to make custom windows and gauges!
< Previous: Chapter 6 - Checking a Door's State Next: Chapter 8 - Creating Custom Windows >Top
You can help keep The Sierra Help Pages and its affiliates alive by helping to defray some of the costs of hosting this site. If it has been of help to you, please consider contributing to help keep it online.Thank you.
The Sierra Help Pages | Sierra Game Help | Walkthroughs | Hints, Tips & Spoilers | Utilities | Links | SHP Forums | Search
© 2013 to present The Sierra Help Pages. All rights reserved. All Sierra games, artwork and music © Sierra.