This chapter will teach you everything you need to know about creating an using actors.
Actors are very similar to props. In fact, they are derived from the Prop class! That being said, creating and using them is very similar to creating and using props, as discussed in chapter 17.
In this tutorial, we will create an actor using a view from the samples, and make it wander around the screen aimlessly. We will also allow the ego to interact with it, making use of the Said() function, and distanceTo() method.
Importing The Actor's View
Before setting up the actor, we will need to add a view for it. To save time, instead of drawing it yourself, you can import one.
 |
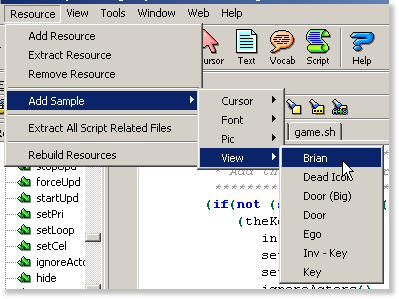
Click on the main menu's "Resource"->"Add Sample"->"View"->"Brian". When the "Add Resource" dialog pops up, save it as view number 1. By the way, that's me! |
Setting Up An Actor
Now that the view has been added, we can set up the actor. As stated, it's very similar to a prop. Actor classes, called "Act" have a number of properties and methods to create the actor. They include all the properties and methods that the prop has, and more.
In rm001.sc, scroll down to the end of the file. There is where we'll add the actor instance.
Add the following lines of code:Code:(instance aMan of Act
(properties
y 170
x 220
view 1
)
)This creates the actor with view.001 (the Brian view) as it's view, and positions it at 220,170. Next, we will add the code to initialize it.
Go to the end of the rm001 instance's init() method.
Add the following line of code:Code:(aMan:init())This calls the actor's init() method setting it up and making it visible.
 |
Click the "Compile and Run" button and you will see the actor is now part of your game! |
Animating Actors
Animating an actor is identical to animating a prop. You must set it's cycler property to a cycler class. Cycler classes allow you to set up how the animation is cycled. The following cyclers are available:
Cycle, Fwd, Walk, CT, End, Beg, Rev
For detailed information on the cyclers, take a look at the Class System section from the SCI Studio Help File.
In the case of this actor, we will use the Walk cycler. This will animate the actor adjusting the loop depending on it's direction so it looks like it's walking.
To set up it's cycler, you will need to add a call to the setCycle() method. Change the following line of code from:Code:(aMan:init())
To:Code:(aMan:
init()
setCycle(Walk)
)
Now onto moving the actor...
Moving Actors
To move an actor, you must select which motion class to use with it. The following motions are available:
Motion, MoveTo, Follow, Wander, Jump, JumpTo, DPath
Each motion is different. For detailed information on each of them, take a look at the section in the Class System section from the SCI Studio Help File.
In the case of this actor, we will use the Wander cycler. This is one of the simplest movers, so it's very easy to set up.
Before you can use the wander class, you must tell the compiler that the current script uses the wander script (wander.sc).
Go to the top of the script and add the line:Code:(use "wander")The reason you never had to add any use statements before was because everything the script used already has a use statement for. To find out which classes are members of which scripts, see the section in the Scripts section from the SCI Studio Help File.
Now, to set up it's motion, you will need to add a call to the setMotion() method.
Change the following line of code from:Code:(aMan:
init()
setCycle(Walk)
)
To:Code:(aMan:
init()
setCycle(Walk)
setMotion(Wander)
)
 |
Click the "Compile and Run" button and you will see the actor is now part of your game! |
Interacting With Actors
In most cases, you'll want the player to be able to interact with the actor. To get your familiar with doing this, we will add a Said handler to allow the player to talk to it. You will also learn how to make use of the distanceTo() method.
Scroll down the RoomScript instance's handleEvent method and add the following line of code:Code:(if(Said('talk/man'))
(if(< (send gEgo:distanceTo(aMan)) 40)
Print("Hello Brian!" #title "You Say:")
Print("Hello there! Welcome to SCI Studio!" #title "Brian Says:")
)(else
Print("You don't want to yell. Get closer.")
)
)First, this checks if the player typed "talk man". If they did, it checks the distance between ego and the man. Note that this distance is not in actual pixels.
- If the ego and man are close enough, it prints two messages. (The #title and other parameters of Print will be discussed in chapter 24.)
- If the ego and man are not close enough, it prints the message "You don't want to yell. Get closer.".
 |
Click the "Compile and Run" button and you will see the actor is now part of your game! |
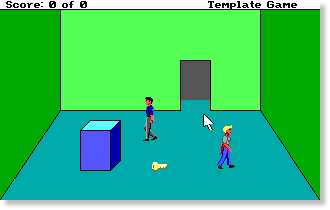
Your game will now look something like this:

That sums up the basics of creating, using and interacting with actors. In the next chapter, you will learn how to make an additional room!
< Previous: Chapter 18 - Handling The Inventory Next: Chapter 20 - Making An Additional Room >Top
You can help keep The Sierra Help Pages and its affiliates alive by helping to defray some of the costs of hosting this site. If it has been of help to you, please consider contributing to help keep it online.Thank you.
The Sierra Help Pages | Sierra Game Help | Walkthroughs | Hints, Tips & Spoilers | Utilities | Links | SHP Forums | Search
© 2013 to present The Sierra Help Pages. All rights reserved. All Sierra games, artwork and music © Sierra.