This chapter will teach you how to add an additional room to your game.
We will now create rm002. Open the game in the Resource Explorer. To begin, we will add it's background to the game.
|
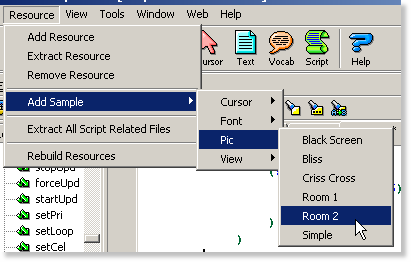
To save you the time of drawing it, click on the main menu's "Resource"->"Add Sample"->"Pic"->"Room 2 ". When the "Add Resource" dialog pops up, save it as pic number 2. |
Now that the picture has been added, we can create the room.
 |
Click on the Script Editor button on the main toolbar. |
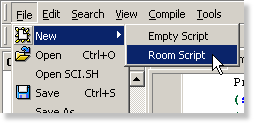 |
In the Script Editor, click on the "File" menu, and select "New"->"Room Script". |
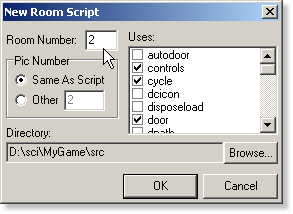 |
The "New Room Script" dialog will popup. All you need to do is set the Room Number to 2 and click "OK". |
You now have the second room's script is now set up.
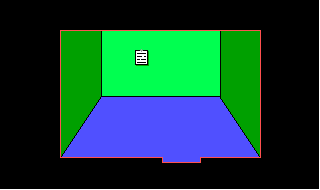 |
We have this pic as the background for rm002. It's simply an empty room with a doorway on the bottom. Naturally, we want ego to be able to walk through it, and when it does, go to the rm001. |
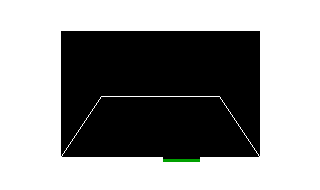 |
To do this, a control line is set up. I chose to make it green, but you can essentially make it any color your want as long as it's not black or white. |
Now we need to add code to check if the ego is on this control line, and if it is, go to rm001. Since we need to continually check, we will put it in the RoomScript instance's doit() method.
Add the doit() method with the following code to the RoomScript instance:Code:(instance RoomScript of Script
(properties)
(method (doit)
(if(== (send gEgo:onControl()) ctlGREEN)
(send gRoom:newRoom(1))
)
)
)Every interpreter cycle the doit() method is called and checks control the ego is on. If it is green, it will go to room #1 (rm001).
Finally, we'll need to set it up so when ego enters the room, it is positioned at the doorway. Scroll up to the rm002 init() method.
Adjust the gPreviousRoomNumber switch to the following:Code:(switch(gPreviousRoomNumber)
(case 1
(send gEgo:
posn(180 155)
loop(3)
)
)
)Since ego can only enter the room from rm001, all you really need is the send to gEgo, but if you were to add more rooms linking to it, you would need the switch.
This checks if the ego has come from room #1. If it has, it positions it at 180,155 and sets it's loop to 3, so it's facing in the up direction.
 |
Click the "Compile" button. The rm002 script is now done! |
The fundamentals discussed are relative to all new rooms you create. In the next chapter, you will learn how to create and use doors and link rm001 to rm002!
< Previous: Chapter 19 - Creating and Using Actors Next: Chapter 21 - Creating and Using Doors >Top
You can help keep The Sierra Help Pages and its affiliates alive by helping to defray some of the costs of hosting this site. If it has been of help to you, please consider contributing to help keep it online.Thank you.
The Sierra Help Pages | Sierra Game Help | Walkthroughs | Hints, Tips & Spoilers | Utilities | Links | SHP Forums | Search
© 2013 to present The Sierra Help Pages. All rights reserved. All Sierra games, artwork and music © Sierra.